Proxmox Storage Upgrade
When I installed Proxmox on my HP Microserver I was quite limited on the storage front. I only had a 250GB hard Drive that had come with my previous Gen7 microserver along with a single 500GB drive.
Rather than put everything on a single disk I decided to use the 250GB drive for Proxmox and ISO storage and use the 500GB drive separately as local storage to hold the virtual machine disks … for my 2 virtual machines.
Although certainly not ideal, this worked well and I had no problems running my (admittedly limited number of) virtual machines off of the single disk.
However …. while I was in the planning stages of adding another virtual machine for monitoring (bringing my total VM count to 6) I realised to my horror that I was still running all the virtual machines on a single disk and was going to have issues sooner or later with the storage and memory.
Solving the memory problem was easy, I just bought another 8GB stick to replace the 2GB stick which brought my memory up to 12GB and I’m already planning to bring this up to 16GB in the future.
My concerns about the storage were as follows:
- No redundancy - Single disk failure == total failure
- IO - Although not a primary concern the drive only ran at 5400 RPM
- Corruption - On my single disk formatted as ext4 this could be undetectable
- Space - 500GB is far to little for me, even when my VM’s are small
After some thinking I decided that I was very unlikely to ever require more than 1TB of virtual machine storage, at least not on this host with the limited CPU and RAM. Also, due to the 16GB memory limit of the Gen8 Microserver I am quite limited in the number of virtual machines I can run and so am unlikely to require a huge amount of IO.
Adding Storage
Rather than simply add another 500GB drive to split the virtual machine load I decided it was far more sensible to use 2 7200RPM 1TB hard drives and set them up in a mirror using ZFS which is now supported by Proxmox.
As the microserver has 4 drive bays I was able to add all the disks at once which made the process nice and simple. I removed the unused caddies and installed my new hard drives (1TB 7200RPM Toshibas).
Although I’m sure it’s possible to hot-add the drives in AHCI mode I decided it would be safer to shut down the hypervisor before adding them.
After restarting the server with my new disks added it was time to create the pool.
Unfortunately it does not currently appear to be possible to do this through the Proxmox GUI although the command line procedure is fairly well documented.
In my case, creating a 2 disk mirror using the disk id’s the command was as follows:
zpool create -f -o ashift=12 vmDiskPool mirror ata-TOSHIBA_DT01ACA100_14AARATNS ata-TOSHIBA_DT01ACA100_Z3MVEWRNSI highly recommend reading through the ZOL FAQ regarding what options to use.
Following on through the Proxmox ZFS guide I edited ZED_EMAIL_ADDR in /etc/zfs/zed.d/zed.rc to allow for email notifications.
I also limited the ZFS memory usage to 4GB (for the time being) by adding options zfs zfs_arc_max=4299967296 to /etc/modprobe.d/zfs.conf.
With the pool created it was time to add it to Proxmox. This is done as follows:
On the Datacenter level of the Proxmox server view, select the Storage tab and click “Add” -> “ZFS”. You can then simply type an ID (name) for your storage pool and select your newly created pool from the dropdown menu.

With the new storage added it was time to migrate my virtual machines.
Migrating the Virtual Machines
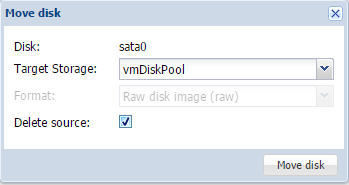
To do this, you can simply select a virtual machine from the server view, select the hard drive under the Hardware tab and click “Move Disk”.
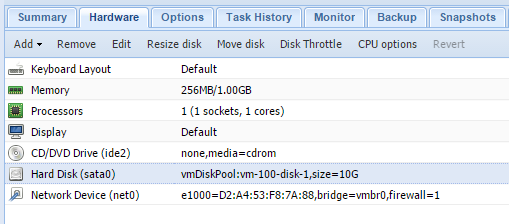
You can then select the target storage and the format for the new disk (this will be RAW on ZFS) and whether to delete the source disk.
You can then monitor the disk migration in the window that opens:
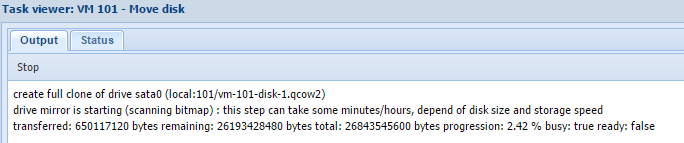
Alternatively, you can close the window to start more disk migrations and monitor the progress in the tasks pane at the bottom. You can always double click on a task to view more detail:

While you can move the disks live and I have done this in the past without issue, I would recommend shutting the VM’s down, especially if you want to migrate more than one at the same time.
With all the disks migrated it was time to remove the old storage.
Removing the old storage
This is done at the datacenter level again under the storage tab by selecting the storage and clicking “remove”.
For local storage you will then have to unmount the disk manually and remove any /etc/fstab entry if necessary.
Personally I only removed the disk from the Proxmox inventory as I plan to use it for another data backup location.
Issues
During the migration I did run into some issues, mainly my own fault.
When I first migrated the virtual machine disks, partially to test performance and partially to see if I could, I tried to migrate them all at the same time while the virtual machines were all running…
While the majority migrated sucessfully, one did not.

As the migration did not complete sucessfully the source disk was not deleted. The virtual machine continued to run normally from the old disk but left a detached disk in the new pool that did not show in the inventory.
Once the migrations had all completed I was able to resolve this as follows:
I opened a shell on the hypervisor and issued the qm rescan command. This found the virtual machine disk and added it to the virtual machine in question in a detached state.
I was then able to select it and delete it from the virtual machine hardware tab.
With the disk removed I was then able to attempt the migration again, this time sucessfully.
Summary
All in all I’m very happy with the new storage setup. It appears to be performing very well and snapshots are now especially fast to work with before running updates or installing new software inside virtual machines.
Scrubs do not run particularly well due to the limited CPU and RAM in the Microserver and I do plan to address this in the future. I also plan to re-install Proxmox and this time use 2 disks in another ZFS mirror to hold the OS.